Your One Stop Local Business News

Tag: garage floor

How To Repair Cracks In Garage Floor – The Garage Floor Company Arizona

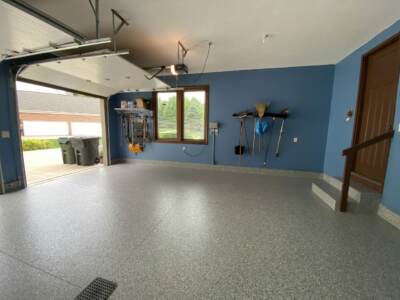
Repairing cracks in a Garage Floor Chandler AZ is a common and necessary maintenance task to prevent further damage and maintain the integrity of the floor.

Whether the cracks are small or large, addressing them promptly can extend the life of your garage floor and improve its appearance. In this comprehensive guide, we’ll explore various methods to repair cracks in a garage floor.

1. Assess the Cracks: Before starting any repair, thoroughly assess the cracks in your garage floor. Identify the size, depth, and potential causes of the cracks. Small surface cracks may only require cosmetic repair, while larger, deeper cracks may need more extensive treatment.

2. Gather Materials and Tools: Depending on the type and severity of the cracks, you’ll need different materials and tools for the repair. Common items include a concrete patching compound, a trowel, a wire brush, a chisel, a broom, a bucket, and safety gear such as gloves and safety glasses.

3. Clean the Crack: Start by cleaning the crack thoroughly. Use a wire brush or a chisel to remove any loose debris, dirt, or old filler from the crack. Sweep or vacuum the area to ensure it’s clean and free of dust.

4. Apply Concrete Patch: For small surface cracks, use a concrete patching compound. Mix the compound according to the manufacturer’s instructions in a bucket. Apply the patch to the crack using a trowel, pressing it into the crack and smoothing the surface. Feather the edges to blend with the surrounding concrete.

5. Allow for Drying Time: Let the patched area dry according to the manufacturer’s recommendations. This may involve keeping the area moist or covering it to prevent rapid drying, depending on the product used.

6. Sand the Surface: Once the patch is dry, sand the surface to create a smooth finish. Use fine-grit sandpaper or a sanding block to achieve the desired texture.

7. Enlarge and Clean the Crack: For larger or deeper cracks, use a chisel to widen and deepen the crack slightly. Clean the crack with a wire brush or vacuum to remove debris and ensure a proper bond.

8. Fill with Patching Mix: Mix a concrete patching mix in a bucket according to the manufacturer’s instructions. Fill the crack with the patching mix, pressing it into the crack and smoothing the surface with a trowel. Ensure the mix is level with the surrounding floor.

9. Allow for Curing Time: Give the patching mix ample time to cure. Curing times can vary, so follow the recommendations provided by the product manufacturer.

10. Seal the Crack: To enhance the longevity of the repair and prevent moisture infiltration, consider applying a concrete sealer over the patched area. Follow the sealer manufacturer’s instructions for proper application.

11. Fill with Flexible Sealant: Expansion joints are intentional gaps designed to allow for concrete expansion and contraction. If these joints develop cracks, use a flexible sealant designed for concrete. Clean the joint and fill it with the sealant, ensuring it remains flexible to accommodate movement.

12. Address Underlying Issues: Determine and address any underlying issues that may be causing the cracks. This could include poor drainage, soil settling, or tree roots encroaching on the garage floor.

13. Consider Professional Help: For extensive or structural damage, it’s advisable to consult with a professional contractor or structural engineer. They can assess the severity of the issue and recommend appropriate solutions.

14. Regular Maintenance: To prevent future cracks, engage in regular maintenance. Keep the garage floor clean, address spills promptly, and avoid heavy impacts or loads that could contribute to cracking.

15. Replace Severely Damaged Areas: In cases where the damage is severe or structural, replacing the affected area may be the best option. Consult with professionals to determine the extent of the damage and the appropriate course of action.

Conclusion:

Repairing cracks in a Garage Floor Chandler AZ is a manageable task with the right materials and techniques. By assessing the cracks, selecting the appropriate repair method, and addressing underlying issues, you can ensure a durable and aesthetically pleasing repair. Regular maintenance and prompt attention to cracks will contribute to the long-term health of your garage floor.

The Garage Floor Company Arizona

2300 W Pecos Rd #126, Chandler, AZ 85224

1-480-405-1661

How to Fix Garage Floor? – Garage Floor Coatings Omaha

Fixing a garage floor can help restore its functionality, safety, and aesthetics. Whether you are dealing with cracks, spalling, or uneven surfaces, addressing these issues is crucial to maintain the integrity of the floor.

Here is the step-by-step process from Garage Floor Coatings Omaha NE that I followed to effectively repair and restore my garage floor:

  1. Assessing the Damage: I began by thoroughly examining the garage floor to identify the extent of the damage. I looked for cracks, spalling, uneven surfaces, or any other issues that needed attention. This assessment helped me determine the appropriate repair methods and materials.
  2. Clearing the Area: To create a clean and clutter-free workspace, I removed all objects, vehicles, and debris from the garage. This allowed me to have ample space to work and ensured that nothing would hinder the repair process. I swept the floor or used a leaf blower to eliminate loose dirt, dust, and debris, ensuring a clean surface for the repairs.
  3. Cleaning the Floor: Next, I focused on thoroughly cleaning the garage floor. I addressed oil stains, grease spots, and other contaminants by using a degreaser and a stiff brush. I scrubbed the affected areas, ensuring they were free from any residue. To rinse the floor, I utilized a pressure washer or hose, removing any remaining debris. It was crucial to allow the floor to dry completely before proceeding with the repairs.
  4. Repairing Cracks: For smaller cracks, I opted for a concrete repair caulk or epoxy filler. I started by widening the cracks slightly, using a chisel or angle grinder to create a V-shaped groove. This allowed for better adhesion of the filler material. I carefully cleaned out any debris or loose concrete from the cracks. Following the manufacturer’s instructions, I mixed the repair product and applied it to the cracks, using a trowel or putty knife. I ensured that the surface was smooth and level with the surrounding floor. It was important to allow the repair material to cure according to the manufacturer’s recommendations.
  5. Patching Spalled Areas: In areas where I encountered spalling or surface deterioration, I needed to patch the affected areas. Using a hammer and chisel or an angle grinder, I removed any loose or damaged concrete. Once the area was clean, I prepared a patching compound or repair mortar according to the manufacturer’s instructions. I applied the patching material to the damaged area, using a trowel to create a smooth and level surface. To blend the patch with the surrounding floor, I feathered the edges. Following the manufacturer’s recommendations, I allowed the patch to cure properly.
  6. Leveling Uneven Surfaces: To address any uneven surfaces or sunken spots on my garage floor, I used a self-leveling compound. Following the manufacturer’s instructions, I mixed the compound and poured it onto the uneven areas. Using a trowel or smoothing tool, I spread the compound evenly to create a level surface. I paid attention to any slopes or drainage requirements to ensure proper water runoff. It was essential to allow the compound to dry and cure as per the manufacturer’s recommendations.
  7. Finishing and Sealing: Once the repairs were complete and had cured, I decided to apply a sealer to protect my garage floor. I chose a sealer suitable for my specific needs, such as an epoxy, polyurethane, or acrylic sealer. I followed the manufacturer’s instructions to apply the sealer evenly, using a roller or brush. I made sure to allow the sealer to dry completely before using the garage again.
  8. Regular Maintenance: To ensure the longevity and durability of my garage floor, I committed to regular maintenance. I swept or vacuumed the floor regularly to keep it clean. I avoided using harsh chemicals or abrasive cleaners that could damage the surface. If I noticed any new cracks or issues, I addressed them promptly to prevent further damage.

Overall, according to Garage Floor Coatings Omaha NE, fixing my garage floor required patience and attention to detail, but the end result was a restored and functional space that I could confidently use. By following these steps and using the recommended materials, I was able to successfully repair and restore my garage floor.

Garage Floor Coatings Omaha

14685 California St, Omaha, NE 68154, United States

402-538-8225

Garage Floor Concrete Polishing-Garage Floor Coatings Omaha

Concrete polishing is a popular method used to enhance the appearance and functionality of Garage Floor Coatings Omaha NE. It involves the grinding and refining of the concrete surface to create a smooth and glossy finish. Concrete polishing offers numerous benefits, including increased durability, improved aesthetics, and ease of maintenance.

In this article, we will explore the process of garage floor concrete polishing in detail and discuss its advantages.

Garage floors are subjected to heavy usage and often experience wear and tear over time. Concrete polishing provides a durable solution to this problem by transforming the rough and dull surface into a polished and resilient floor. The process involves several steps, starting with the preparation of the surface.

Before polishing can begin, it is essential to ensure that the garage floor is clean and free of any coatings, adhesives, or contaminants. This typically involves the removal of existing floor coverings, such as epoxy or paint, through mechanical means or chemical stripping. Once the surface is clean, any cracks or imperfections in the concrete are repaired to create a smooth and even base.

The next step in the concrete polishing process is grinding. This involves using specialized machinery equipped with diamond-embedded discs to remove the top layer of the concrete surface. Initially, coarse-grit discs are used to eliminate any surface irregularities and create a level profile. As the process progresses, finer-grit discs are employed to refine the surface further. Grinding not only levels the floor but also exposes the aggregate within the concrete, giving it a unique and aesthetically pleasing appearance.

After the grinding process, the concrete surface undergoes a series of polishing steps. Polishing pads with progressively finer grits are used to achieve the desired level of smoothness and shine. Each pass with a finer-grit pad removes the scratches left by the previous grit, resulting in a progressively glossier finish. This multi-step polishing process is repeated until the desired level of sheen is achieved.

One of the significant advantages of concrete polishing is its low maintenance requirements. The polished surface is resistant to stains, spills, and tire marks, making it easy to clean and maintain. Regular sweeping and occasional damp mopping are usually sufficient to keep the garage floor looking clean and presentable. Additionally, the polished surface is highly reflective, which helps improve lighting conditions in the garage by maximizing the reflection of natural and artificial light sources.

Another benefit of concrete polishing is its cost-effectiveness. Compared to alternative flooring options, such as tiles or epoxy coatings, concrete polishing is often more affordable. It eliminates the need for additional floor coverings and reduces the long-term costs associated with floor maintenance. Additionally, the durability of the polished concrete surface extends its lifespan, providing a long-term investment for garage owners.

In addition to the practical advantages, concrete polishing also offers aesthetic benefits. The glossy finish of the polished surface adds a touch of elegance to the garage, enhancing its overall appearance. The exposed aggregate and smooth texture of the polished concrete create a unique and modern look, which can be further enhanced with decorative options like color dyes or saw-cut patterns. This versatility allows homeowners to customize the look of their garage floor to match their personal style and preferences.

In conclusion, Garage Floor Coatings Omaha NE concrete polishing is a highly effective and versatile method for enhancing the functionality and aesthetics of concrete surfaces. It involves the grinding and polishing of the concrete to create a durable, easy-to-maintain, and visually appealing floor. The process removes imperfections, exposes the aggregate, and achieves a glossy finish. With its low maintenance requirements, cost-effectiveness, and aesthetic benefits, concrete polishing is an excellent choice for homeowners looking to transform their garage floors into attractive and long-lasting spaces.

Garage Floor Coatings Omaha

14685 California St, Omaha, NE 68154, United States

1-402-538-8225

Garage Floor Safety-Omaha’s Best Epoxy Garage Floor

The Epoxy Garage Floor Omaha NE, often overlooked in terms of safety, plays a crucial role in maintaining a secure environment within the garage. Whether you use your garage for parking vehicles, as a workspace, or for storage, taking proactive measures to enhance garage floor safety is essential.

This article aims to provide you with a comprehensive guide to garage floor safety, discussing potential hazards and offering practical solutions.

  1. Identifying Common Hazards: Before addressing safety measures, it’s important to identify potential hazards commonly found on garage floors. These include: a) Slippery surfaces caused by oil spills, water leaks, or condensation. b) Uneven surfaces and cracks that pose tripping hazards. c) Chemical spills or leaks that can result in harmful exposure. d) Cluttered spaces that obstruct movement and increase the risk of accidents.
  2. Regular Cleaning and Maintenance: To maintain a safe garage floor, regular cleaning and maintenance are crucial. Follow these steps: a) Sweep or vacuum the floor to remove loose dirt and debris regularly. b) Promptly address oil spills and leaks by using absorbent materials like cat litter or specialized spill kits. c) Use appropriate cleaning agents to remove grease and grime from the floor’s surface. d) Repair any cracks or uneven surfaces promptly using suitable materials.
  3. Ensuring Slip Resistance: Slips and falls are major concerns in garages. To enhance slip resistance on your garage floor, consider the following measures: a) Install slip-resistant flooring materials, such as epoxy coatings with additives or rubberized mats. b) Use anti-slip tapes or paints to highlight potential hazard zones, such as steps or ramps. c) Ensure proper drainage systems to prevent water accumulation on the floor. d) Use rugs or mats in areas prone to moisture or spills, such as near entrances or workstations.
  4. Proper Lighting: A well-lit garage is essential for maintaining a safe environment. Consider the following lighting tips: a) Install bright overhead lighting to illuminate the entire garage area. b) Use task lighting for specific work areas, ensuring clear visibility. c) Consider motion-activated lights for added convenience and energy efficiency. d) Regularly check and replace faulty bulbs or fixtures to avoid dim or dark spots.
  5. Organizing and Decluttering: Cluttered spaces in the garage not only hinder movement but also increase the risk of accidents. Follow these organization tips: a) Implement a systematic storage system with designated spaces for tools, equipment, and other items. b) Use shelves, racks, and cabinets to keep items off the floor and easily accessible. c) Keep frequently used items within reach, minimizing the need to navigate through cluttered areas. d) Regularly declutter the garage, disposing of unnecessary items and maintaining a clean and organized space.
  6. Hazardous Material Handling: If your garage stores hazardous materials, such as paints, solvents, or fuels, proper handling and storage are crucial: a) Store hazardous substances in designated cabinets or containers, away from ignition sources. b) Label all containers clearly to identify their contents and potential hazards. c) Follow manufacturer guidelines for proper ventilation and temperature control. d) Educate yourself and others on the safe handling and disposal of hazardous materials.

Conclusion: Taking proactive measures to ensure Epoxy Garage Floor Omaha NE safety is essential for creating a secure environment. By identifying potential hazards, maintaining cleanliness, enhancing slip resistance, improving lighting, organizing the space, and handling hazardous materials correctly, you can significantly reduce the risk of accidents and promote a safe garage for yourself, your family, and visitors. Remember, a well-maintained garage floor not only enhances safety but also contributes to the overall functionality and usability of the space.

Omaha’s Best Epoxy Garage Floor

5060 Dodge St, Omaha, NE 68132, Estados Unidos

1-402-814-8957

What is Best Flooring for Garage? – The Garage Floor Company

As a homeowner who has spent a significant amount of time researching and exploring different flooring options for my garage, I understand the importance of finding the best solution. After considering various factors such as durability, functionality, and aesthetics, I have come to a well-informed decision.

For me and by following research from Epoxy Garage Floor, epoxy coating emerged as the top choice for my garage flooring. The reasons behind this decision are manifold. Firstly, epoxy coatings offer a sleek and polished surface that not only enhances the overall appearance of the garage but also adds a touch of professionalism. The range of colors and finishes available allowed me to personalize the space according to my preferences, creating a visually appealing environment.

Durability was a crucial aspect that I took into consideration, as my garage is subject to heavy use. Epoxy coatings have proven to be highly resistant to stains, chemicals, and abrasions, ensuring that the floor remains in pristine condition even with frequent vehicle traffic and potential spills. Additionally, the ease of cleaning and maintenance associated with epoxy coatings made it a practical choice for me.

While exploring alternatives, interlocking floor tiles caught my attention. These tiles, typically made from PVC or polypropylene, offer a versatile solution that is easy to install. However, I opted for epoxy coating over interlocking tiles due to my preference for a seamless and uniform surface, which contributes to a cleaner and more streamlined look.

Considering budget constraints, I also explored more cost-effective options such as concrete stain or paint. Concrete stain offers durability and an attractive finish, while concrete paint provides protection against stains and chemicals. These options were appealing, but in the end, I desired a higher level of customization and a more professional appearance, leading me to choose epoxy coating instead.

In conclusion, according to Epoxy Garage Floor and as a homeowner looking for the best flooring solution for my garage, epoxy coating proved to be the ideal choice. Its durability, resistance to stains and chemicals, easy maintenance, and aesthetic appeal were the key factors that swayed my decision. Transforming my garage into a functional and visually pleasing space has truly enhanced its overall value and usability.

The Garage Floor Company

866-507-0096

Powered by WordPress & Theme by Anders Norén